
On behalf of Rona, Sharon, Elaine, Karen, Jenny, and myself, we welcome you to our tutorial. So, what goodies do we have to share today? Well, our challenge is to MAKE A PROJECT THAT REFLECTS THE COLORS OF YOUR COUNTRY, or even maybe where you would like to live someday, or your favorite country to visit if you are a globetrotter! Rona put together a fabulous project and tutorial to share with you today, and this one is a doozie!!!

Tutorial for a Loopy Flower by Rona Mallard
Items needed: Twine or String; 12 straight pins; cork or cardboard; scissors; needle
First you will need to make your loom. I used a thick cork board cut to a 2 1/4 circle. You can also use cardboard (or two pieces of chipboard glued together) as long as you can stick the pins in the edges. You will stick your 12 pins in at equal distances around the circle. I placed a red pin (which is my starting place across from black) then matching colors opposite each other all the way around. It does not have to be perfect as long as you get all 12 pins in.


Next, Take your twine and leaving a 2 inch tail; wrap around the pins from top to bottom (this is why I placed the colored pins opposite each other it helps remember where you are) My first wrap is always around the red with the tail hanging by the black. Go around the loom twice (if you are using a single string of twinery twine you may want to go around 3 times).

Once you are finished wrapping, cut your twine with 12 – 14 inches out and thread through your needle.
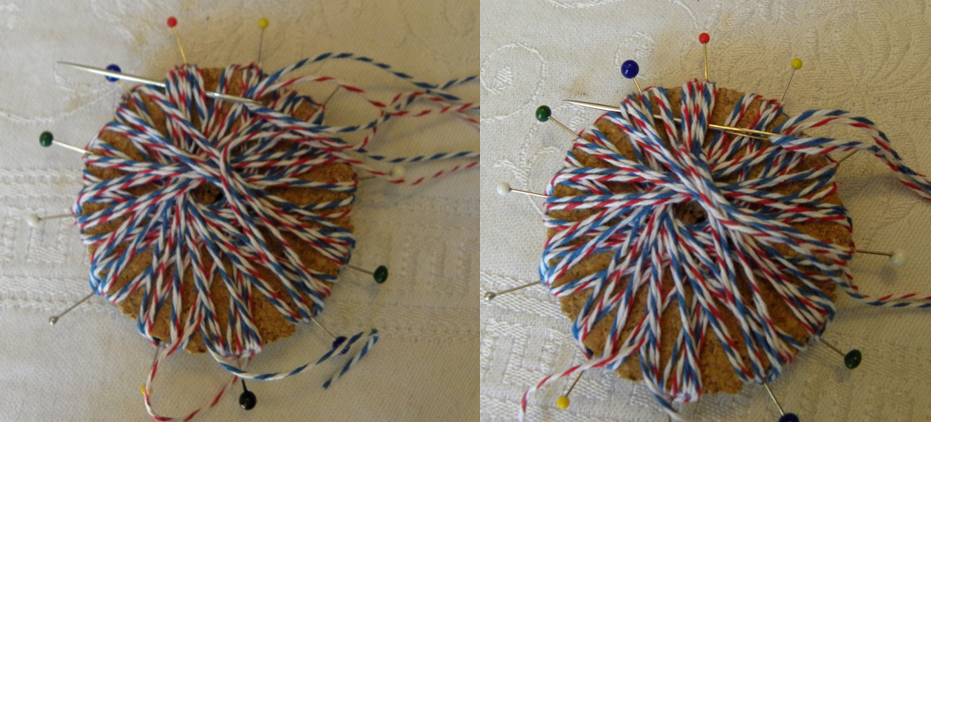
You will then “backstitch” around the circle. I always start at the red pin going under all of the twine wrapped around that pin. From then on you will go under two of the sets of twine (two pins). This will make a loop over each of the “petals”. I like to squish those stitches down to the center of the circle as close as you can for a nice loopy petaled flower. I go around the circle twice because it ends up with a nice braided look when you flip it over.

After you have gone around twice you should be back at the red pin and have a tail left to tie to the tail you had in the beginning (by the black pin). Tie a knot to secure. Then you will begin pulling out your pins to release each petal. I pull it out then replace it right back in the same place so it will be ready for your next flower. Go all the way around to release the entire flower and then flip it over. Your loopy flower is finished!!

I hope you have lots of fun with these. I certainly have!!! I have made several for wreaths and cards. I have even seen these on banners

Woo hoo! Look at THAT beautiful creation! Rona certainly outdid herself on this tutorial and that gorgeous wreath! Rona says she was inspired by a Pinterest project from Meridian Road. Thanks so much for stopping by and joining us on the 2000 Member Party and Blog Hop! If you started at the beginning and made it all the way to me, I should be the last one on your blog trip. If you finished up here, you can jump back over to The Outlawz and click on the 2000 Member Party tab at the top of the main page. If you still haven't visited everybody yet, here is the list and the links:
Blog Hop Order
The Outlawz Host: Colleen Holmes
CAS Host: Pryn Garritan
Greetings Host: Tina Gilliland
Color Host: Teresa Arsenault
Sketch Host: Cindy Potentier
Twisted Thursdays Host: Patricia St. Martin
Copic/Promarkers Host: Darlene Lyons
Paper Ala Mode: Theresa Lee (you are here)
Don't forget to do a few things:
1. Leave a comment here on this blog.
2. Head back over to The Outlawz and click on the 2000 Member Party tab at the top of the Main Page. Click on the Tutorial Blog Hop thread and follow the instructions there And if you make a project, please post it in the Inlinkz.
3. Join in playing some of our games and challenges throughout the week.
4. Have fun!
Big hugs to you all, and thanks again for hopping along!
FANTASTIC post, Tee!!! Rona really knocked my socks off with that tutorial! She is the flower making queen! can't wait to make some of these fab flowers for future projects :)
ReplyDeleteLove and hugs to you my DT Sistah!
Hi Pryn(cess)! Thanks for stopping by to visit - love and hugs right back at ya!
DeleteWhat a fantastic technique for making flowers Rona, thanks for sharing her technique with us Teresa. I love to learn new ways to make flowers. The tutorial was awesome.
ReplyDelete:S
Hi Sandra - thanks for stopping by! I will pass your kind words on to Rona! She really knocked it out of the park with this one!
DeleteYou make it look simple and easy, great tutorial.
ReplyDeleteThanks for stopping by Nadja!
DeleteOh gosh! These look great!
ReplyDeleteThanks Trina! Love and hugs to you!
DeleteWhat a fabulous idea, Theresa! I'm gonna have to give this one a try!! Hugs!
ReplyDeleteHi Darlene! Thanks for stopping by! Big hugs to you!
DeleteWhat darling flowers. Might have to give that a try. Thanks for sharing.
DeleteLove these cute little flowers. I am definitely going to have to give them a try. Just became a follower as I know I will get lots of inspiration from your blog.
ReplyDeleteThanks for stopping by Crystal, and for following me! I will give you a shout on your blog when I get a minute or two! Big hugs to you!
DeleteThese flowers are really unique! Guess I am going to have to try them, too! :^)
ReplyDeleteHugs,
Penny
Thanks for stopping by Penny! Hope you enjoyed the blog hop! Big hugs!
DeleteLOVE your Tut!!!
ReplyDeleteThanks so much for this great tu, gonna go try these!!!
Your blog is fabulous!!
Thanks so much for the chance to win such yummy hop candy!!
Hugs
Lorianna
Hi Lorianna! Thanks for stopping by and for your kind words! Big hugs!
DeleteTheresa love your flowers...I always wondered how to make them....Thanks for a great tutorial...Huggz
ReplyDeleteThanks Anne! Glad you stopped by! I will pass your kind words on to Rona - that tutorial was all her magic! Big hugs!
DeleteNow this is clever, another beauty for gifts. Thanks sistah, hugs
ReplyDeleteHi Berni! Nice to see you over here! Thanks for stopping by! Big hugs!
DeleteWow what a flower... I find it such a fun idea..
ReplyDeletethanks
Debbie Ebat
Hi Debbie, thanks for stopping by! Big hugs to you!
Deletewow...these would be awesome to make, ty so much for sharing the tutorial with all of us, Rona sure did a fantastic job on the wreath, it's sooo pretty :)
ReplyDeletebig inky hugs Theresa :)
Thanks for stopping by Cindy, and I will pass on your sweet comments to Rona! Big hugs!
DeleteOh I am going to have to try these. They turned out great! I love the look. Thanks so much for the tutorial.
ReplyDeleteI happen to see your son just graduated. Congratulations to you both. My daughter just graduated. :o) It is such a bittersweet time. So proud, but I hate to see her grow up so fast.
Hi Tonya - thanks for stopping by the hop, and congratulations to you and your daughter. It's hard to believe it's been 18 years since my little rascal was born, and I guess he's not so little anymore. I'm excited to see him spread his wings and fly! Big hugs to you!
DeleteGorgeous flowers, thanks for the tutorial and the chance to win!
ReplyDeleteHi Allisa, thanks for stopping by, and I'm glad you enjoyed the tutorial! Big hugs to you!
Deletethanks for the tutorial! i love these flowers x so cute!!
ReplyDeleteHi Stephanie, glad you like those cool flowers - Rona did a great job on that tutorial. Thanks for stopping by! Big hugs!
DeleteThat is neat how you made your own loom! The flowers turn out cute! Thank you so much for the tutorial!
ReplyDeleteThanks so much for stopping by to visit the blog hop! Glad you like the tutorial! Big hugs to you!
DeleteTheresa, what a fabulous idea these flowers are. Rona you are a star for sharing these with us. Great tutorial, thanks to you all. hugs Ursula
ReplyDeleteHi Ursula! Big hugs to you sweetie! That Rona sure is a star, isn't she! Thanks for stopping by!
DeleteFantastic flowers! Thanks Theresa! I can't wait to try this one out.
ReplyDeleteHi Tabbatha - thanks for stopping by the blog hop! Hope you try out the flowers and let me know how they turned out! Big hugs to you!
DeleteOh what a super tutorial! Love these handmade flowers.
ReplyDeleteThanks for stopping by the blog hop Margaret and for your kind words! Big hugs to you!
DeleteGreat tutorial, love these flowers and I've already planned what to use them on, lol!
ReplyDeleteThanks
Hugs
Hi Laurian! Thanks for stopping by and for the kind words. Can't wait to see your flowers! Big hugs to you!
DeleteLOVE this tutorial! How cool is this flower with the twine. I am going to try this as I'm into making my own flowers now. I've never seen one made of twine. Great job!
ReplyDeleteHi Regina! So glad you stopped by to check us out! Big hugs to you!
DeleteFantastic flower tutorial, Theresa! They are so cool! I'm definitely going to give these a try!
ReplyDeleteHi Carla! So glad to see you as always! Would love to see your flowers when you're done! Big hugs to you!
DeleteOh WOW how fun is that! I love that this are flat flowers great for cards of any project. The wreath is wonderful - love it.
ReplyDeleteThanks for stopping by Debra! Glad you like the flowers and tutorial! Big hugs to you!
DeleteWhat a fun tutorial. A new take on flowers. Nice job.
ReplyDeleteHi Tracie - glad you stopped by the blog hop to check out the tutorial! Big hugs to you!
DeleteGreat job on the tutorial, Rona! Many thanks to you and Theresa for sharing this fun idea...I really like the way the flower turns out and the fact that it is flat! Hugs, Pat
ReplyDeleteHi Pat! Always nice to see you! Big hugs to you!
DeleteLove these!!! What fun and besides the wreath, I can see using these on cards :>) Off to pin this post!
ReplyDeleteTheresa Wow! I really love these flowers! Thank you so much for sharing!
ReplyDeleteArabella
Those are GREAT!! Thank you so much for the tutorial, so easy!!
ReplyDeletethanks for this great tutorial. i can't wait to try this...
ReplyDeleteGreat loopy flower. Thanks fro sharing this tutorial. I am now a follower.
ReplyDeleteI love this look , so unique yet sassy... I am seeing many ideas blooming...
ReplyDeleteGreat tutorial - love the loopy flower! I'm off to become your newest follower (you know...found you at the Outlawz...) and would love to have you follow my blog too! Hugs...
ReplyDeleteWow, I love how your flower turned out. I have tons of leftover yearn I'm going to try this with!
ReplyDeleteGreat tutorial! Thanks for showing us how easy it is.
ReplyDeletethat is such a pretty flower! looks like something I MIGHT be able to do..... ;) thanks for the instructions!
ReplyDeleteLove the loopy flowers, you did an awesome tutorial. I will be back to try the flowers and look at each step.
ReplyDeleteHugs xxx
What a fun flower to make!! Thanks for the tutorial, will have to give it a try.
ReplyDeleteLinda
Oh how wonderful - I love this loopy flower tut. Honest, I've never done one and I am always using yarn and cord for projects! Thank you for the wonderful portrayal! BTW I'm from Cuba City WI and also am following you!
ReplyDeleteI love your loopy flower with the two colours of twine! what an incredibly wonderful idea!!! Thanks for sharing it!
ReplyDeleteluv'n huggz
Jen Leeflang
Durban
South Africa
What a cute embellishment. Always looking for something different. Tutorial was very clear. Thanks for sharing.
ReplyDeleteGreat embellishment. Thanks for sharing. Greensboro, NC.
ReplyDeleteGreat colors for 4th of July. Lots of possibilities for other holidays as well. Thanks for the tutorial. Looks like fun to do.
ReplyDeleteFabulous tutorial, wow what a blog hop. Seems I'm at the end :-( But I'll be back another day:-) Thanks for sharing.
ReplyDeleteWhat a fabulous idea! Thanks, Rona, for the tutorial and thank you, Theresa for sharing it. I can't wait to make one!!!! Hugs, Sistah!
ReplyDeletegreat idea - can't wait to try this - thanks
ReplyDeleteThank you for sharing how to make the loopy flowers. They are so pretty. I hope to try this. I am a follower of your blog. Edwina Brown edwina.brown@live.com
ReplyDeleteThank you for the tutorial!!
ReplyDeleteIt amazes me how talented all of you are -
Ima newbie but I sure will be watching and hopefully learning lots!!
Beautiful. Thanks for sharing. :)
ReplyDeleteI remember these when I was Outlaw from Oregon obsorbing your knowledge. With all the talent throughout this hop I hope to get inspired to create at the end. Thanks for all you do,Tootsie from Astoriayoung thanks for the tut...
ReplyDeleteWill definately have to try this - thxs for the tutorial.
ReplyDeleteSo cool, I love how these flowers look. Thanks for sharing this tutorial, you've got a new follower :)
ReplyDeleteThis is a really trippy idea and I just love it! Thanks so much for sharing the tutorial with us {{{hugz}}}
ReplyDeleteLove that the flower turns out to be flat. you wouldnt think so by just looking @ it. Great job. im a newbie follower. looking forward to seeing what comes along for you
ReplyDeleteThanks for sharing your tutorial. Flowers look fun and a great addition to any project!
ReplyDeleteGreat tutorial. I love the flower. I like the fact you can make your own homemade loom.
ReplyDeleteHow pretty! Love the tutorial, now to see if I can do it :O) Thanks so much!!! Hugs! Leah Ann
ReplyDeleteI am a huge fan of flower techniques, and this one tops the cake...woo hoo Rona! So happy to be celebrating with the Outlawz and happy to become a new fan here at your blog Theresa!
ReplyDelete:O)
Jessica S
You always comes up with such awesome ideas! I sure wish my brain was this creative!!
ReplyDeleteHugs and Have a Happy PARTY week!!
Lis
Theresa I have been waiting for this tutorial to go up for me to stash in my to do project folder lol. Thank you for sharing hun... and Rona of course...
ReplyDeleteHugz Elaine x
Theresa this is fantastic and Rona really did out do herself! You make it look so easy and I will give it a go! Thank you for being such an awesome designer and staying with me!! Love you! Hugz
ReplyDeleteGreat flower and good instructions to go with it xx Angela Hoynes
ReplyDeleteThanks to all of you who have left such sweet comments about the tutorial. I really hope you do try this - it is so fun!! Thanks Theresa for posting the tutorial and for making sure my rambling instructions made sense!!
ReplyDeleteIm a new follower!!!
ReplyDeleteveronica
familyofscrappers2004@yahoo.com
Those are so cute, Theresa. Thanks for sharing Rona's tutorial. Blessing hugs, Teresa (TODT)
ReplyDeleteI would have never thought to use that sing like that, ssooo cool!!
ReplyDeleteVeronica
familyofscrappers2004@yahoo.com
Love the flower and especially the wreath. Great idea.
ReplyDeleteThanks.
Oh my i've just got to try these...super fab tutorial...tfs
ReplyDeletekimbob27 at hotmail dot com
These are so neat, I can't wait to try it!!
ReplyDeleteI've got to try to make these. Thanks for the instructions. I'm already a follower.
ReplyDeleteBabe
youiesmom@att.net
What a great idea for flowers! I love this. I will be attempting this in the near future. Thank you for the inspiration.
ReplyDeleteThis is a great tutorial and it made a beautiful flower. I hope to try it in the future.
ReplyDeleteWhat cute little flowers. Your so creative.
ReplyDeleteGreat tutorial. Thanks :) ... veronica
ReplyDeleteGreat tutorial. Will have to get out my Baker's Twine and maybe go a little Red and White for Canada or maybe Red, White Blue and Yellow for British Columbia.
ReplyDeletethat pretty awesome i will be trying that one i am now one of your follower
ReplyDeleteLove the tutorial.
ReplyDeleteThanks Loretta
Theresa - great loopy flower! TFS - I just signed on to be a follower of your blog and I'm looking foward to more of your creations.
ReplyDeleteHow cool is this?! GROOVY flowers and tutorial. Gotta try this technique!
ReplyDeleteWow! Love that flower. It looks simple with your great tutorial.
ReplyDeleteVery pretty flower, nice tutorial. Must give this a chance. Thanks.
ReplyDeleteOh, wow, this is so cool! Thank you so much for sharing your tutorial!
ReplyDeletexx Star
This is so neat Teresa! Your directions are so easy to follow that even I may be able to make them.Thanks so much for sharing.
ReplyDeleteHuggs
Wow great tutorial on how to make flowers. I have never seen anything like this. Thanks.
ReplyDeleteHow creative and beautiful! They look beautiful on your wreath! Thanks for sharing!
ReplyDeleteOff to get some baker's twine!
ReplyDeleteI love working with twine and fibers so this little flower is right up my ally so to speak! thank you so much for teaching us this adorable little cutie!
ReplyDeleteI am from Cumberland ME.
How cool! I love using twine on my cards and here's a way I hadn't seen before. Thanks a bunch for the tutorial. I will definitely try this one!
ReplyDeleteSo very clever, Theresa! A new way for me to add twine to my cards (which I dearly love!), and to make flowers at the same time. I can't believe I wasn't follower before but I am now. :-D Hugs.
ReplyDeleteThank you for another wonderful tutorial. I am so full
ReplyDeleteof great info and tips. This has been a great hop.
And you all have done a great job.
Thank you
Beth
First off I have to say what a great looking son you have great picture of you two. I still remember when my 2 boys graduated, it is a proud feeling. Anyway-- Great tutorial, & you made it so easy using colored pins. I will be making these,Ty.
ReplyDeleteBecame a new follower. You ladies sure made it nice & easy for us Outlawz newbies, Ty.
Hugs,
Julia from Longview, Wa.
Aha its like this they are made, fun to learn and I really did that here, thank you ever so much!
ReplyDeleteWhat a fun way to use twine on a card or any project, so dang cute! Great tut, TFS! From Bremerton, Wa
ReplyDeleteSuch cute flowers!! Looks very simple after seeing this great tute :)
ReplyDeleteLove it!!! Diffently going to try this. Thanks for sharing.
ReplyDeleteHugs..
very nice tutorial Theresa!!!
ReplyDeleteI will try this some time :)
And I enjoyed the bloghop!!
These look like so much fun! Thank you for the neat idea!
ReplyDeleteVery cool tutorial! Great job to you or Rona or whoever wrote it up. Too bad I don't have any twine as I would love to try this. Just stopping by on the hop. Don't know if I'll have time to enter the challenges but at least I'm playing all the games! LOL
ReplyDeleteHugs,
Anne
Thats so neat!! I have tons of yarn at home to try this on. Thank you!!
ReplyDeleteVery, very creative idea. I will definitely have to give this a try.
ReplyDeleteJust became a follower of your blog.
This is really cute, gotta give it a try, thanks
ReplyDeleteWhat a wonderful twine embellishment. I must try this! Beautiful. thank yu for sharing for our big celebrations!
ReplyDeleteHugs
Marie XX
What a fun tutorial! Love the way the flower looks! Great job!
ReplyDeleteWhat a fun tutorial. Great flower. Need to try this.
ReplyDeleteGreat idea and a good tut thank you.
ReplyDeleteFantastic project!!!
ReplyDeleteAwesome project! Looks like a lot of fun! I can't wait to try it out!
ReplyDeleteWhat a cool flower. Great tutorial. TFS Oh yeah, I'm a new follower too..:)
ReplyDeleteThat is just incredible! I am going to give it a try, hope it looks even half as good.
ReplyDeleteHugs-Jenn Zeeb
WOW! Love your loopy flower & tutorial!
ReplyDeleteAbsolutely love your loopy flower and tutorial. So many wonderful things going on with this blog hop. So much to see and do.
ReplyDeleteHugs,
Laine
Lovely, have to try this one day! Have a beautiful day!
ReplyDeleteThat is really cute! Love the twine!
ReplyDeleteFun tutorial!It reminds me of something I did when I was a kid only I used an empty thread spool with nails hammered in the top
ReplyDeleteCute flower design. I'll give it a try soon. Thanks for all your help.
ReplyDeleteWOW! How cool was that? love the flowers and think I will be making some soon- thanks for sharing! Thanks too for the prize op-
DeleteWhat an awesome tutorial!!! I will be making some of these. These would look cute on barrettes or clips! Thank you for sharing!
ReplyDeleteThanks for the tut - Once I saw a flower that looked like this and you have inspired me to try this.
ReplyDeleteWow! These look great! Takes me back to when I used to do French knitting as a kid, or making poms poms with two cardboard donuts. Great! ~Amy H
ReplyDeleteAll I can say is Wow! Those are some nifty flowers!
ReplyDeleteThank You
Polkadotlady
I love flowers and now I have a use for that Baker's Twine that I have. Thanks for the fabulous tutorial.
ReplyDeleteI love these flowers. They are totally awesome. I can't wait to make some thanks for the idea.
ReplyDeleteWOW, what a great finished flower. TFS the tutorial.
ReplyDeleteKaren
stampinQT@comcast.net
These flowers are great...definitely have to give them a try!
ReplyDeleteRenee Butchart
Oh wow. That is very cool.
ReplyDeleteGreat tutorial!
Very unique...TFS
ReplyDeleteHow cool are these flowers!!! Ecellent tutorial.
ReplyDeleteWhat a creative way to the use this twine...love it!
ReplyDeleteWhat a great tutorial. I really like the flowers - when I saw the loom I though you were making pompoms at first - these are so much cuter!
ReplyDeleteThanks for the chance to win!
Cool flowers, it is always nice to make
ReplyDeletethings yourself instead of buying them
ready. Thank you for sharing.
Amazing tutorial. Love the flowers and looking forward to making some myself. Thanks for sharing.
ReplyDeleteHugs
Laine
Lovely tutorial -- I have just GOT TO get some Baker's twine! Thank you for sharing.
ReplyDeleteBoy does this take me back to elementary school she we did cool things like this. When and why did we stop thinking it important?! Thanks for the reminder!
ReplyDeleteThat flower is so cool! Can't wait to try it!! Thanks :)
ReplyDelete