Marilyn Nimmo!
I did one of those random number generator things, and Marilyn's number was the winner. Congratulations Marilyn - as soon as I get your address, I have a little RAK goodie bag to send you!
I also want to take a moment to acknowledge all of you wonderful ladies who took the time out of your busy schedules to participate. I appreciate each and every one of you, and will make the time to send each of you a personal thanks on your blogs or emails or on SSC messaging. Your comments were very sweet and really made me feel special! Big hugs to you all!
And many thanks to Nikki and all the SSC Design Team for putting together the blog hop. Simply Scrapping Crafts is planning a weekend crop for sometime in January, so keep your eyes open for that one. This will be our fourth weekend crop, and the last three were so much fun and everybody had a great time. I hope everyone will come out and join us!
Wednesday, December 8, 2010
Saturday, December 4, 2010
Welcome to Simply Scrapping Crafts First Annual Holiday Hop! We have quite a line-up for you today filled with lots holiday inspired goodies! Our DT has been busy at work in Santa’s workshop creating a sled full of gorgeous holiday projects to help you decorate, scrapbook or use for gifts!. Be sure to comment all of the blogs along the way because we have "hidden" some extra special treats along the way. There is no way to tell where we have them stashed, so be sure not to miss out! Some of our hop hosts are giving an extra entry for becoming a follower. Who doesn't appreciate more chances to win right? All winner will be announced on Tuesday, December 7th, 2010 via the DT blogs and also in the hop room at SSC, which can easily be accessed here . You have until 11:59PM EST tonight, December 4th, 2010 to comment for your chance to win. All you need to do is click on each link and leave a comment as you hop along to the end of the list. Are you ready for a Holly Jolly Holiday Hop? Let's get to hoppin'!
Maureen http://stampandscrapwithmaureen.blogspot.com/
Theresa http://procrastinatingscrapper.blogspot.com/ (YOU ARE HERE)
Nikki - http://gracie33.blogspot.com/
Rona http://scraprona.blogspot.com/
Colleen http://cardsdelight.blogspot.com/
Amy http://amybeansblog.blogspot.com/
Clare http://bearydocardsinc.blogspot.com/
Pryn http://mochavation.blogspot.com
Tammy http://tmaynard.blogspot.com/
Now, for the good stuff! I have two projects to share with you today. The first is a tree made from a paperback book. I saw one of these on the internet a few years ago, and was entranced. I finally took the time to look up the directions for how to make one and tried it myself. This is my tree.

Unfortunately, my busy life has been extra busy this week and I did not have time to make a photo tutorial, but this is really easy to make. It takes less than 30 minutes to put the whole thing together, so it is also friendly for busy schedules like mine. I would love to have an entire "forest" of these little guys.
Supplies needed:
Paperback book
Sharp craft knife
Decorations (I used glitter and a pretty star, but you can use whatever you like - the possibilities are only limited by your imagination)
Directions:
Choose a paperback book with a strong spine and remove the covers.
Slice the spine with a sharp knife to separate the first 30 pages. This will make the first half of the tree.
Begin folding the pages. First, fold the top right corner toward the spine to form a right angled triangle.
Fold the triangle toward the spine again.
The bottom edge of the page will overhang the bottom of the book.
Fold the overhanging triangle at the bottom of the book back up to form a straight line along the the bottom of page.
Repeat with all thirty pages and set aside.
Use the knife to slice another 30 pages from the book. Turn this section so the spine is on the right, rather than left. Repeat the steps above to create a mirror image.
Glue the two halves of the Christmas tree together and add your decorations.
Tips: I tried using Glimmer Mist on mine, and that is not a good idea. The moisture in the Glimmer Mist made the paper "sag" a little bit, losing some of the crispness fo the folds. I did end up putting dots/globs of glue along the folded edges of the paper and sprinkling with some flaky Martha Stewart glitter. The tops of the folded star has a lot of natural slits in it, and I put strong glue on the end of my star and adhered it down into one of those slits.
NOTE: If you have any questions or need any assistance making one of these, please let me know. I am more than happy to help.
The second project I wanted to share is a little banner that I made for my Secret Sister. I should have mailed it to her already (they don't call me a procrastinator for nothing).

I used a cool banner die that I got from The Cat's Pajamas. I cut banner shapes from a variety of papers and added a bunch of various elements to make a Joy, Joy banner. These are quick and easy to make, they can be as fancy or simple, or elegant or rustic as you like. I try to make at least one for myself for each season of special holiday of the year - I hope you'll try one for yourself! And I hope my Secret Sister likes this one!
Thanks to you all for stopping by and taking a look. I have a great little prize package of paper crafting goodies to send to a random hopper who leaves a comment here on this blog post. I will also be giving an extra chance to win the RAK to each person who is already a follower and leaves a comment or becomes a follower today and leaves a comment.
The next destination on the hop is Nikki - http://gracie33.blogspot.com/.
Big hugs to you all! And happy hopping!
Wednesday, December 1, 2010
Holiday Blog Hop this Saturday!!!

The Simply Scrapping Crafts design team is hosting a holiday blog hop this Saturday! Hope you can stop by and maybe even play along. There will be prizes and great inspiration projects and a chance to get to know some new crafters!
Monday, November 15, 2010
Merry Christmas!
Woo hoo! I actually got some crafty things accomplished this weekend! I decided to try my hand at a clean and simple look, and this is what I came up with:

I used a Tim Holtz stamp and added some Stickles to those gorgeous snowflakes. The ribbon is from Stampin' Up - love that gorgeous stuff - perfect for Christmas cards! The rubon is from Kaiser Craft. That's it - just that simple. Actually I was going to go for just the snowflakes, but I just couldn't resist blinging them up a little bit!
Now I've got to get busy and get some more cards together! Time is flying and I'm pretty much standing still!
Thanks for stopping by! Big hugs!
Sunday, November 14, 2010
I'll Be Home for Christmas!!!
Two posts in the same day? This is a record for me! Woo hoo!
I just couldn't resist finishing up the card for this cute little image from A Day for Daisies - is this not the cutest little baby ever??? Tammy has several other coordinating images on her site - she is such a talented artist!

I colored the iamge with pencils, and added some glitter - what is a Christmas card without glitter??? The patterned papers are from Pink Paislee and The Girls' Paperie. That gorgeous ribbon is from Stampin' Up. The sentiment is from Cosmo Cricket.
Thanks for stopping by! Big hugs!
Thanksgiving is Coming ... and I'm Not Moving Fast Enough!!!
Okay, trying to get caught up on my projects, but not making a lot of progress! I've been teaching myself how to color with colored pencils and how to color with Copics at the same time, and with limited available free time, I haven't actually finished very much.
I did manage to finish these four Thanksgiving cards this weekend. They all use the same image from A Day for Daisies - Tammy's art work is amazing! But I made each of the cards themselves slightly different. The photos aren't all that great - too much shadow when I took them, so you can't really see the subtle backgrounds on each image - I think they look much better in person.


As far as papers and embellishments for these cards, I used Basic Grey Pyrus collection (from a 6x6 pad). I used my favorite Stampin' Up Top Note die to cut out the images - Catherine Pooler is an awesome Stampin' Up lady! Those GORGEOUS ribbons are from one of my favorite Etsy shops, Creating Is Fun. I used Prismacolor pencils. And those awesome little alphabet stickers are from Cosmo Cricket.
Now back to work finishing up some other cards that I'm making with other A Day for Daisies digital images!
Thanks for stopping by! Big hugs to all!
Monday, October 18, 2010
Yah!!! Winners!!!
We at Simply Scrapping Crafts would like to thank you for making our very first Blog Hop such a smashing success! We had so much fun creating our projects for you and hope that they inspire you to create ones of your own and share them with us!
As you know, we had some prizes "hidden" on certain blogs. Without further adieu, here is our master winners list:
Barb's Boys...prize hidden on Deb's blog
Julie M....prize hidden on Georgia's blog
Lisa (Purple Place) AND Trina...there were 2 prizes hidden on Theresa's blog
Andrea6760...prize hidden on Rona's blog
Helen...prize hidden on Amy's blog
Terry G (T)...prize hidden on Emily's blog
Denise...prize hidden on Clare's blog
Roxann...prize hidden on Pryn's blog
Again, we would like to thank you for your participation and look forward to bringing you many more hops in the future :) Please do not be a stranger and stop back anytime you would like! We would love to have you :)
********************
Another big personal thanks to each and every one of you who stopped by my blog and left me some love! Some of you I have "known" for a long time, and some of you are new friends. I appreciate each and every one of you, and look forward to spending much more time together! Big hugs!
Sunday, October 17, 2010
A Big Thanks and Many Hugs to Everyone!
Hi everyone! I apologize for not getting a photo of the prize up before the hop, but I wanted to see what I could find at the stamp show yesterday. Unfortunately, it wasn't all that great, but I did pick up a couple of things that I think will be useful to the recipient.
I decided to have two RAKS, and here are the photos of each:
This is one of the RAKS. The Crate Paper Restoration collection is almost impossible to find - it was a huge sellout. But I managed to find one of the 6x6 pads, which is a great size for card makers. I also threw in a cool bow maker that I found yesterday, a glitter pen, a glaze pen, some ribbons, buttons, and miscellaneous goodies. No, Baby Boo doesn't come along with it - she just wanted her picture taken!

This is the second RAK. These are also papers from Crate Paper, some alphabet stickers, die cut papers, ribbons, buttons, and other goodies.

And since Baby Boo got her picture on my blog, Boo Kitty insisted that she be included as well. This is the queen of the household!

I will have the winner list from the entire hop up later tonight or sometime tomorrow. In the meantime, I wanted to say a big "Thank You" to everyone who participated in the hop. I hope you had fun and got a little bit of inspiration. I appreciate all of your sweet comments, and I thank everyone who became a follower of my blog. I feel like a Rock Star, thanks to all of you!
Big hugs and much love!
Saturday, October 16, 2010
Halloween Blog Hop - Simply Scrapping Crafts
Welcome to Simply Scrapping Crafts First Annual Haunted Hallow Hop! We have quite a line-up for you today filled with lots of tricks and treats! Now what would trick or treating be without candy? Eye candy that is! Our DT has been busy at work in Dr. Jekyll's lab creating just the right formula to inspire your hauntingly sweet projects this year. Be sure to comment all of the blogs along the way because we have "hidden" some extra special treats along the way. There is no way to tell where we have them stashed, so be sure not to miss out! Some of our hop hosts are giving an extra entry for becoming a follower. Who doesn't appreciate more chances to win right?
All winners will be announced on Tuesday, October 19, 2010 via the DT blogs and also in the hop room at SSC, which can easily be accessed here . You have until 11:59PM EST tonight, October 16, 2010 to comment for your chance to win. All you need to do is click on each link and leave a comment as you hop along to the end of the list.
Are you ready for a frightfully wicked Haunted Hallow Hop? Let's get to hoppin'!
Deb
Maureen
Georgia
Theresa - YOU ARE HERE
Nikki
Rona
Colleen
Amy
Emily
Clare
Pryn
*********************************
Hi everybody! Welcome, and thanks so much for stopping (or is that hopping) by! I am so glad to have you here!
Are you having fun yet? Getting some good inspiration and ideas? I certainly hope so, and I hope to be able to inspire you a bit more today.
I decided to make an Autumn banner for the Hallow-Hop, but went for some non-traditional shapes - 4 chipboard trees and 3 chipboard houses. The trees are from Maya Road and the houses are from Creative Imaginations. I put all seven of the pieces close together to get this photo.

This photo shows the banner hanging outside on the deck - I can get much better photos outside than inside.

So here are some individual photos that show each of the seven pieces up close. I used all sorts of embellishments for these, but all of the patterned papers are from Basic Grey.
This first tree shape uses Webster's Pages Bloomers and American Crafts rose ribbon pieces, along with Webster's Pages Sparklers and Basic Grey felties.

This second section, one of the house shapes, uses some lace pieces that I had in my stash to accent the roof, along with some green vine ribbon that I also had in my stash (I bought both of those at a recent scrapping convention, but they were generic). It also uses AC Thickers, a Cosmo Cricket cat rubon, an Ippity by Unity stamp as the base for a 3D pumpkin, and alphabet stickers by Cosmo Cricket. I get my Ippity stamps from Rona, my dear friend and favorite Ippity Chick at http://scraprona.blogspot.com/. She not only brings us fabulous stamps, but she throws in wonderful goodies with every order!

The second tree is my favorite I think. It uses a chipboard tree from Little Yellow Bicycle, Bazzill cardstock that was embossed with a Cuttlebug folder, and pieces of a Magnolia garland purchased from Lisa Keifer's Etsy shop at http://www.etsy.com/shop/Paw2Reflect. I love the elegance of the soft colors and the gorgeous garland gems.

The center piece is for Halloween. I used several chipboard pieces from Little Yellow Bicycle, a stamp from Cosmo Cricket accented with Stickles, rubons from Cosmo Cricket, and some cute pumpkin and spider brads from Queen & Co. I also added a bit of glittered cardstock behind the chipboard house for some sparkle in the windows. Like that ghost coming out of the chimney? I thought that was a cute touch!

This next tree was also decorated for Halloween. I used some more of those Little Yellow Bicycle chipboard shapes and a few buttons. The spider stamp is from Ippity. That crazy looking cat is my favorite! The spider's web and all of the faux stitching on the trees was made using a Glaze pen by Sakura.

This last of the three houses is in subtle colors and geared to Autumn in general. I used an Ippity by Unity tree stamp and banner stamp. I accented the tree stamp with gems from Kaisercraft. The banners are accented with tiny type stickers from Cosmo Cricket. I also added some Basic Grey border stickers and Stickles to the roof, along with a cloud shaped chipboard piece from Little Yellow Bicycle.

This final piece, the fourth tree, was covered with little circles of glitter cardstock punched out with a Stampin' Up punch, then another layer of Basic Grey buttons in various colors. A couple of felt leaves from Queen & Co. were placed at the base of the tree. I get my Stampin' Up goodies from http://www.catherinepooler.com/ - Catherine is a doll!

The gorgeous orange satin ribbon used throughout the project was purchased from this awesome Etsy shop: http://www.etsy.com/shop/Creatingisfun. Martha is the owner, and she not only has fabulous goodies in her shop, but the prices are awesome too!
Soooo ... thanks again for hopping by and I hope I was able to get your creative juices going at least a little bit.
Please leave a comment for an opportunity at a random drawing I will be doing for a RAK, and if you become a follower of my blog (please make sure you tell me in your comment so I don't miss it), I will give you an extra entry in the drawing.
The RAK is full of yummy goodness of the non-caloric paper-crafting type - I did not get a chance to take a photo and post it, but you will definitely enjoy all the great "stuff"!
Big hugs and Happy Hopping to you! Now head on over to visit Nikki and see what yummy goodness she has to inspire you with!
Wednesday, October 13, 2010

Sunday, October 10, 2010
Lovable Inspiration

Aren't these little kitties the sweetest? This digistamp is from A Day for Daisies (http://adayfordaisies.com/) - Tammy, who is the artist, is so awesomely talented. I love cats, so just couldn't resist this cute little Halloween image. I colored it with pencils and gamsol, then made a card out of it, which I will probably send to my sister for Halloween - she loves cats and always enjoys getting one of my handmade creations!
Getting ready for this Saturday's Simply Scrapping Crafts First Annual Hallow-Hop! I have a really fun creation - well, it's really seven creations in one - to hopefully inspire everybody. Can't wait to show it to everyone!
Thanks for stopping by, and don't forget about the hop this Saturday!
Wednesday, September 22, 2010
You Color My World - with Doodles

The Week 3 challenge for Creative Corner at Simply Scrapping Crafts (www.simplyscrapping.ning.com) was to use doodles in your project. I put this layout together last night using colored pencils, a Zig Writer pen, some alphabet stickers from American Crafts and Pink Paislee, and fuel from a French martini!!!
Thanks for stopping by! Big hugs!
Stamping and Stitching

Our challenge for the Stamp & Scrap group over at Simply Scrapping Crafts (www.simplyscrapping.ning.com) this week is to use a stamped image as the outline for stitching. I used this gorgeous cardinals stamp and some Bazzill floss to stitch portion of the pine needles. Unfortunately I'm not sure who makes that stamp - I just happened to have it in my collection, but it's one of my favorites!
I also used a Tim Holtz stamp for the snowflakes, some Webster's Pages papers from a 6x6 pad, an Imaginisce jeweled snowflake, a Stampin' Up brad, and a transparency from Little Yellow Bicycle.
I had never tried this technique before, but now I'm in love with it!! I don't have a lot of stamps in my collection (yet!) but I'm sure I'll be searching my stash for another one to try this on!
Thanks for stopping by, and visit us over at SSC in the Stamp & Scrap group to see what everyone is making, and maybe you'll get inspired to try this yourself! We'd love to have you!
Big hugs!
Tuesday, September 21, 2010
Be Well
My friend Angie had some surgery yesterday, and I made this card over the weekend to send to her. As usual, I am a bit late, because the card won't get to her until she's probably well on her way to recovery, but hopefully she likes the card anyway. She is a sweet, special lady, and I pray that her recovery is swift!

I used a paper from a 6x6 pad of the newest Prima line, which is beautiful enough to stand on its own, but you know me - gotta add a bunch of stuff! I distressed the edges a bit. I couldn't decide which color of the dyed seam binding I liked the best with it, so I added all three. I also got a new stamp from Stampin' Up, and used that to hold the sentiment - I added a bit of color with Copics and a few pearls. The sentiment is made with Cosmo Cricket tiny types.
Thanks for stopping by!
Sunday, September 12, 2010
Back to School Weekend Online Crop
Whew! It's been a busy weekend between Chris' football game in Gloucester Friday night and keeping up with all the challenges and games on our Simply Scrapping Crafts Back to School Weekend Online Crop.
We've been planning the crop for a few weeks now - I have to give it to my Design Team sisters - they really put their thinking caps on and came up with some fabulous ideas and inspirations for this crop. I spent some time last week putting together a couple of examples to be posted with my challenge and one of Angie's challenges.
This first example was for my Back to School Shopping Challenge. The little guy is on his way to get his new clothes so he can start school!

Angie put together an Art Class challenge. She had an inspirational photo of a paint palette covered with a bunch of beautiful colors, and I made this card as a sample for her challenge. Her photo was really inspiring, and I used a cool technique I recently found online to make the background colorful portion - it's actually a baby wipe that has been wadded up and pressed against different colors of ink pads.

I have been hosting one challenge - Back to School Shopping, and one game - the Pop Quiz. Since there wasn't a whole lot I had to do once I got my challenge and game posted to the community, I took the time to play along with a bunch of the other challenges and made some cards, layouts, and even an altered project.
This first layout was for my challenge, Period 1: Back to School Shopping. The challenge was to make a project inspired by your memories of back to school shopping for clothes. I used these photos of Chris' first day of 11th grade, which was last Tuesday, along with some tags and packaging from his new clothes and backpack.

These next two layouts were made from photos of Chris' football game Friday night. The first one is for Drama Class, where the challenge was to create a project that somehow illustrated drama.

This one is for Music Class, where the challenge was to create a project inspired by your favorite song. Kenny Chesney's "The Boys of Fall" is a great song, and I especially love the video. I think it is so inspiring to young people, but also brings back great memories of my time in high school and college always looking forward to the big game each week.

I made this card for Emily's Home Ec Class. The project was to make a fabric flower following her tutorial, then use it in a project. I've been wanting to learn how to make these flowers, and thanks to Emily now I can.

This card was for Clare's History Class. The challenge was to use paper that was at least two years old. I wasn't sure I had any, as I like to frequently purge my supplies (actually I have to purge them or I wouldn't be able to get into my craft room). I have been hoarding this Blue Awning collection from K & Company, which is one of my all time favorite paper lines. I made this card with some Webster's Pages lace and a fabulous ribbon from Rona Mallard.

Amy hosted Literature Class, and the challenge was to make a project that in some way uses a book. I had seen a tree online a couple of years ago like this and even went so far as to buy some glitter and things to make a set of them for Christmas decorations, but never did. This was the perfect opportunity for me to look for directions online and try my hand at this. It turned out really well, although I learned not to spray the tree with Glimmer Mist, as the moisture caused the sharp folds to wilt a bit. We are going to make these in one of our upcoming Creative Corner weeks, so I'll have to put a tutorial together.

Angie put together an awesome tutorial for a bookmark, and I played along. I seem to always be making things with cats on them. I had these really cute felties from Basic Grey, and just had to use this little cat with some other embellies. I'll probably end up sending this to my sister Liz - we call her the Crazy Cat Lady!

Brianna hosted Lunch - and who doesn't love lunch - and the challenge was to make a cute little snack sack. This is my take on the challenge - I opted for a Halloween theme, and will probably fill this with goodies and give it away to one of my trick-or-treaters.

And last but certainly not least, Pryn hosted a tutorial on making notepaper, and after you made your notepaper, you were supposed to write a note to someone and pass the note - you know, like you did in school! Well, Roxann started the whole thing with a note to Edward to meet her behind the buses. Nikki followed up with a note to everyone saying she was sorry she couldn't play in the classrooms more than she's been able to do this weekend. So I followed up with this note to Nikki!

We all had a fabulous time this weekend. We had a lot of participants, and these weekend crops are always a big blast! Thanks for stopping by, and if you didn't get to play along with us this weekend, hopefully you can make it next time!
Big hugs to all!
Friday, September 10, 2010
I Miss You

Our Creative Corner challenge at Simply Scrapping Crafts this week was to make a design with a nested shape. I had a cool new heart stamp from Stampin' Up, so I wanted to use that as my nested shape. I also had some new stamps from Ippity, and one of them was this awesome vintage postcard. So I played around for awhile trying to come up with something, and this was the card I made. I like the whole frou-frou vintage Victorian feel sort of thing it's got going on.
Card making is my recent trend in paper crafting. I started out making mostly mini albums, transitioned into scrapbook pages, and now I am doing mostly cards. However, I have noticed that the way I designed mini album pages carried over into my scrapbook pages and now carries over into my cards. I love dimension and lots of different textures and shapes - I am definitely not the CAS type of paper crafter!
Thanks for stopping by!
Saturday, September 4, 2010
A Scrappin' Up Saturday
I got some new Scrappin' Up goodies from my dear Catherine Pooler (http://www.catherinepooler.com/), and I was crafting like a crazy woman. I ended up making three different cards - two just because, and one for a challenge over at Simply Scrapping Crafts that will post later this week.
This first one uses the new fall line of patterned papers - so yummy! I also used some Stampin' Up stamps from 2002 (somehow that makes me feel old - oh wait! I am old!), some alphabet stickers from Cosmo Cricket, and dyed seam binding that Clare Prezzia made for me (http://bearydocardsinc.blogspot.com/p/seam-binding.html). I used a Martha Stewart Punch for the border.

This next one uses the Sizzix Top Note die that's exclusive to Stampin' Up. Everything is Stampin' Up except for the patterned paper (that's one sheet front and back) and sentiment sticker, which are both Cosmo Cricket, and the tiny pearls which are from Want2Scrap. I used a Martha Stewart Crafts punch for the little butterflies.

Now I got a bunch of new Ippity stamps in the mail today from my dear Rona Mallard, so I'll be busy playing with those tomorrow! One of these days I'll get all the housework and things done that I keep putting off so I can play!
Thanks for stopping by! Big hugs!
Tuesday, August 31, 2010
Scrapbooking.com publishing the Autumn Is ... design
Scrapbooking.com online magazine is publishing the "Autumn Is ..." design that I created for my dear Amy's housewarming gift. It will be published in the October issue. I had to remove the photo of it from here on my blog and on the other places where I had posted it. How exciting! This is actually they third time they have published something of mine - it's always such an honor! Jami Petersen, who is the Editor in Chief, always seems such a nice lady. I think she spends a lot of time looking for artwork to publish, because she has always found mine and approached me for publishing without my submitting it to her. I'm excited!
Sunday, August 22, 2010
An Ippity Weekend
Spent some time this weekend playing around with my new Ippity stamp sets that I got from Rona! I made 3 different cards.
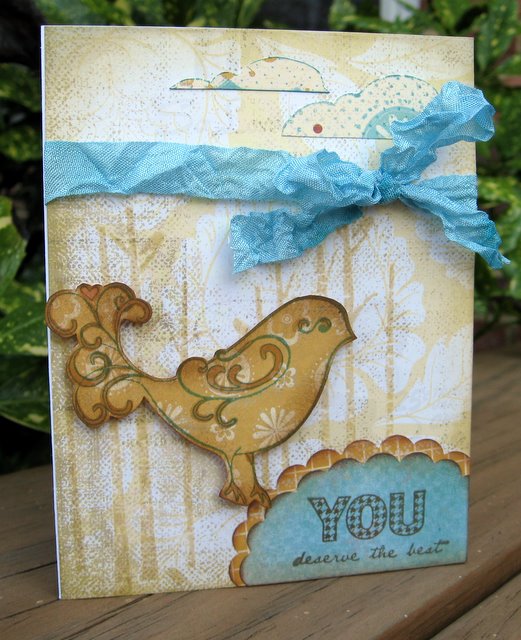
This first one is my favorite. I love the way the flat-stamped images on the card base work with the stamped and cutout images on the different patterned papers. The flower and the houndstooth corner are from the new "You Deserve" set, and the sentiment is from the "So This Is Love" set.

I decided that houndstooth corner could be used to make a pleated flower, so I stamped and cut out 8 of them, glued them together, and added a Prima paper flower and a coiled rose I made on top, with a little lace on the bottom.

This was the first card I made Friday night. I was trying to get something together, but my brain just couldn't pull the idea together. It's an odd color combination, but I think it turned out okay - nothing to write home about, but a decent stab at something. I still want to come up with a better way to use those background trees - I love that stamp!

Thanks for stopping by!
Saturday, August 21, 2010
Feeling a Little Ippity (or not)
I got some new Ippity stamps this week, and have just been too busy and tired to play with them. Last night I really wanted to create something, but just couldn't come up with a design that I liked. I did finally come up with this card - it's a weird color combo and an odd design, but I guess it turned out okay.
I used stamps from 4 different Ippity sets to make this, along with some Scribble Scrabble papers that were left over from my "Autumn Is ..." layout, a couple of scalloped ovals that I cut with one of my punches, and some Ranger Distress Inks and Colorbox cat's eye ink.
Thanks for stopping by! Big hugs!
Wednesday, August 18, 2010
Autumn Is ...

Every Wednesday at Simply Scrapping Crafts (http://simplyscrapping.ning.com/) we have a Paper Scraps challenge. This week's challenge was to make a paper-pieced landscape. I had an idea in my mind to make a housewarming gift for my fellow design team angel Amy, who I also call my "Scrappy Daughter", and I started out to make a sort of "Home Sweet Home" sort of project, but somehow it morphed into this Autumn Is ... thing.
I especially like those round "leaves" I made from some leftover glitter cardstock - I used a small circle punch I purchased from Stampin' Up via Catherine Pooler (http://catherinepooler.com/), and that little mighty mite cut through that thick stuff like butter - I'm getting rid of all my other little holes punches - they wouldn't even scratch that thick cardstock!
I also used my favorite Ippity stamp that I got from Rona Mallard at (http://scraprona.blogspot.com/) - it's what I used to make those journaling banners. That is the best stamp EVER - I would use it on everything I make if I could figure out how to work it into the design.
All the patterned papers and cardstock are from my scrap drawer. I happened to see the new Spellbinders design for cloud-shaped Nestabilities, so I mimicked it for my clouds. The house is a couple of Maya Road chipboard shapes stacked on top of one another. The little bird is from the same Maya Road chipboard set. The tiny brown alphas are from Cosmo Cricket and the tiny orange ones are from My Little Shoebox - I love those tiny alphas. I have over 10 sets of them now in all kinds of colors - they are just so versatile, but I admit to loving the neutrals best. Those two pumpkins are made from oval scallops cut out on my Cricut, folded and glued together, with a couple of little pieces of vine ribbon stuck out the top. The larger chipboard alphas are all American Crafts, and those rubons are Pink Paislee.
Now I need to get this thing into a frame (Target sells those great 12x12 shadowbox frames fo4r $9.99) and into the mail to Amy!
We also had our Creative Corner weekly challenge, and the challenge is to use cardboard. Angie Blom (http://angiesscrappinspot.blogspot.com/) made an amazingly gorgeous and creative cardboard mini-album. I can't even hold a candle to that, but I made a cute little card with a piece of cardboard that just happened to be laying around.

Thanks for stopping by! Big hugs to everyone!
Friday, August 13, 2010
Pretty Cards and Things!

I made this card for the Simply Scrapping Crafts August Week 2 Creative Corner challenge. The challenge was to make a pinwheel and use it in a card or layout. I made 3 pinwheels, but only used 2 of them on this card. I also got my Ippity groove on and used 4 of their stamps: 1 for the sentiment, 1 for the banners, 1 for the sheet music background, and 1 for the dotted background along the bottom. I just love all these new Ippity stamps I got - amazing quality and designs!
I used an Antique Linen distress ink for the background stamps to give them a subtle nature.
The pinwheels were fun to make - haven't done that in a zillion years!

After I made my "Sisters" layout last week, I used some of the scraps to make this card for the SSC August Week 2 Paper Scraps challenge. The challenge was to make rolled paper flowers - I made one medium-sized one and two small ones to add to this card. I also used an Ippity stamp for the sentiment, some additional Prima flowers, and a Stampin' Up little flower punch for some tiny flowers to accent the larger ones. I used gems and Liquid Pearls for their centers.

I was on another Ippity groove, and made this card with some more of my "Sisters" scraps. The bird and the diecut label are both cut from a Cricut cartridge. There's that gorgeous Ippity sheet music background stamp again - I think it looks really pretty on top of that Prima patterned paper. That stamp is in the same set with this sentiment stamp. And that fabulous soft blue ribbon was a gift from Rona when I purchased my Ippity stamps from her - check out her blog and Ippity stamps (an entire new fall stamp menagerie was just released yesterday) at http://scraprona.blogspot.com. Rona will take excellent care of you!
Thanks for stopping by! Happy Friday!
Sunday, August 8, 2010
Sisters and Rob's Stash

Grace and Bernice are two beautiful ladies who I have known for quite a few years. They are sisters. Grace recently passed away, and I had this photo of them together, so I decided to make something for Bernice as a memorial gift. I put this layout together and put it in a shadow box frame (Target for $9.99), and I will give it to Bernice this week.

One of the young men I know is heading off to college next week, so I made him a container full of goodies. I used a shortbread tin, spray painted it, then covered it with cardstock in his new school colors with some inspirational quotes and rubons. I filled it with popcorn, cookies, candy bars, other snacks, and added a sewing kit, some gift cards for local restaurants, a roll of quarters, and some cash. I think he's really going to like this.
Thanks for stopping by to look. I've got to head out to deliver Rob's gift to him this afternoon.
Big hugs to everyone!
Subscribe to:
Posts (Atom)