Saturday, August 3, 2013

Inspired by Pinterest

Hi, and welcome!  This week I was spending some time looking around over at Pinterest, and I ran across a fabulous card by Nicole Heady, who is one of the Papertrey Ink design team ladies.  It was white stamped on kraft cardstock, then the white was outlined with a Copic marker.  Love, love, love!  If you want to see Nicole's card, here is the link:  Link to Nicole's card (you need to scroll down a bit to see it).

So I decided that would be my inspiration for our "Inspired by Pinterest" challenge at the Outlawz for this week's Saturday Paper a la Mode Challenge.  I love this challenge!  My daughter and I cook Pinterest recipes all the time, so I probably should have put a picture of something yummy here, but since it's a paper challenge, that wouldn't quite hit the mark.  In fact, I am making two different recipes tomorrow to take to a picnic that I got from Pinterest (maybe I'll take pictures and post them next weekend).

Anyway, I pulled out my trusty white inkpad (which is getting a bit dry because I rarely use it), a pretty flower stamp from Unity Stamp Company (I got it when it used to be the Ippity Stamps), and some of my large stash of kraft cardstock (I like to keep lots on hand, because kraft and black cardstock are my go to colors).  I also added some of my favorite mini alphabets for the sentiment, a pretty ribbon, and a few tiny jewels for flower centers on the 3 flowers I cut out and raised up with pop dots.


I like the way it turned out, and I plan to try this technique a lot more - maybe with some different colors to see what that looks like (will probably try a scrap first).  One note:  the Copic ink sinks into and spreads fast on the kraft cardstock because it's so porous, so just be aware.  It also didn't take a very dark color to do this, probably because the color sinks in and spreads so quickly - it would be different if it were on the typical smooth cardstock we use for Copic coloring.  I love the depth that the outlining adds!

Thank you for stopping by!  Big hugs and showers of blessings to you!

Thursday, August 1, 2013

Hop, Skip, Jump

Obviously I'm late and need to "hop" to it and get this project posted from last weekend!  As I always say, they don't call me a procrastinator for nothing!

I made this card using a digi I've had for several years from Daphne Hardy.  Daphne was making digis for a short while, and her stuff was just so cute and special, but alas, she left the scene and decided to do something different.  But nevertheless, I just adore this sweet bunny - I colored it with my Prisma pencils and then added some background shading and color with my Copics.  I'm still using older papers and things from my stash - not buying any new stuff until I pare down some of these pile of stuff I already have on hand!


Thanks so much for stopping by, and have a "hoppy" day!  Big hugs and blessings to you!

Friday, July 19, 2013

CHRISTMAS IN JULY

Yes, it's only 6 months away!  I love making Christmas cards and decorations and goodies (especially the yummy goodies), so Christmas in July is always a fun crafty theme time for me.  That's our theme this week over at The Outlawz for the Saturday Paper a la Mode challenge.  I love to make cards, but a lot of times I want to do something more 3-dimensional.  I decided to make some decorations.  I've made something similar to these before and used them for pumpkins and hearts - very versatile if you have the right shape of punch or die, or if you have a Cricut or other electronic cutter that can cut lots of the same shape.

I decided to make 2 different ones just so you can see the difference if you use more or fewer cutout pieces.  The one with the beads only uses 8 pieces, and the other one uses 16 for a much "fuller" shape.  After I put them together, the one with the 8 pieces looked so sparse that I started looking for a way to fill in some of the empty space.  I have a lot of beads in my stash so started "engineering" (I put that in quotes, because I'm not an engineer and my solutions are typically not so "elegant" as a real engineer might make) a solution for getting the beads onto the ornament.  What I ended up using is 8 strips of very thin wire (one for each "slot") to thread the beads onto - the wire is bent in half, with the "bend" at the bottom, one leg running up through the center of the ornament and one leg running up through the beads, then twisted together at the top, where the twisted end is wound into a little spiral shape (looks a bit like something from a Dr. Seuss show).  Hopefully that explanation makes sense.  I used a variety of beads and configurations for some variety, but obviously you could use whatever colors and shapes and arrangements that make you happy.


This second picture shows the beads a little more close up so you can see the details.


Hopefully you find time over the next 6 months to get all the cards, decorations, and goodies created that you want to - I tend to always run out of time, but maybe now that this challenge has given me a bit of inspiration, I will continue with my "preparations".

Thanks for stopping by!  Big hugs and showers of blessings!


Saturday, July 13, 2013

GIFT WRAPPING

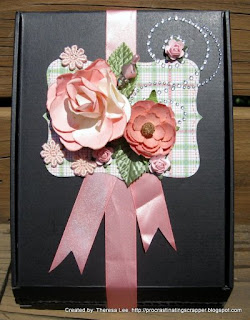
When 3 of my daughter's friends were graduating from their resident program, she and the other residents pitched in and bought each of them a Kindle.  Michelle was responsible for the gift buying and wrapping, so when it was time to wrap the Kindles up, she came to me for assistance.  I started showing her some options, because she didn't really want to use wrapping paper, and things just snowballed from there, with me in the middle of the snowball rolling down the hill!  Ha!  Ha!

I used a variety of different ribbons and goodies I had in my craft room, including a die cut shape as the "background" for each decoration.  The die I used, which is my all time favorite, is the Top Notes die from Stampin' Up - love that thing!

The one with the big star is for a guy, and the other two are for the ladies.


I enjoyed doing this, and Michelle said they loved how pretty they were decorated.  I fixed the wrapping so that the ribbon would come loose without having to remove any of it, then reattach back in case they wanted to keep it for something else.

Thanks for stopping by!  Remember to stop by The Outlawz and play along with our Saturday Paper a la Mode challenge.  Our theme this week is: USE YOUR FAVORITE TOOL, AND TELL US ABOUT IT.  My favorite tool is my die cutting machine (I have a Sizzix) and my Top Notes die.

Big hugs and showers of blessings!

Saturday, July 6, 2013

SUMMER!

Looks like summer has finally made it to my part of the world.  Seems like we had a couple of weeks of just clouds and rain, clouds and rain, but the 4th showed up beautifully, and now we've had a few days of hot sunny weather, and it looks like we'll have a few more.  This morning is gorgeous outside!

This week's theme over at The Outlawz Saturday Paper a la Mode Challenge is SUMMER!  I had some leftover summer-themed papers from Webster's Pages that I used to make a banner a couple of years ago, which I gifted to my dear friend Jenn - she hangs it on the wall of her craft room, which makes me feel very loved!  This is a picture of the banner - I loved making all the different layers and adding in the little elements.


Hard to tell from that photo, so here is a closeup of one of the parts:


I also had a leftover little mason jar filled with flowers from when I was trying to make some ATCs (I find it very difficult to work in such small size), so I used that as the center of my card, and built the rest of my summery, patriotic card around that.


Thank you for stopping by, and I hope you are enjoying your weekend!  Big hugs and many blessings to you!

Saturday, June 8, 2013

VINTAGE STYLE

Oh goodness - how time flies!  Here it is another weekend already!  Not that I'm really complaining, but it just seemed like I can never get the things accomplished I mean to, if you know what I mean.

This week's Saturday Paper a la Mode Challenge over at The Outlawz is to make a "vintage" style project.  I'm not sure how good I ever am at sticking to a script, so to speak, but this is my "take" on vintage style.  I actually love this sort of "flowery" look, with lots of layers and flowers and things, but I do try to get away from it sometimes and try to do the "less is more" look, although I'm certain that I'm not so good at that look.  My philosophy is usually if there's an inch of blank space, I need to glue something to it!

Anyway, here's my card:


Thanks for stopping by to visit!  Big hugs!

Saturday, June 1, 2013

TAGGING a GIFT

Hi, and thank you so much for stopping by to visit!  It's Saturday again - woo hoo!

Our challenge for this week over at The Outlawz is to make a project involving tags and/or labels.  My sister-in-law, Annette, has been under the weather of late, so I wanted to make a little gift for her.  She loves my home-baked goodies, so I decided to bake her a pan of my homemade cinnamon rolls.  But then I decided I needed something to personalize the food, so I decided to make her a tag with an envelope attached to add a gift card.

I used a bunch of scrap papers I had laying around from a project ages ago, but that I still love with the pretty blues and blacks combination.  I think it turned out really nice, and she will love it.  It's very feminine and has little pearls and pretty curves.  I wrote a nice message to her on the back.


Now I've got to get busy and bake those cinnamon rolls so I can take them to her today.  I know she's going to love them and the tag, and we will have a great visit together!

Thanks again for stopping in to visit!  Love and hugs to you!